

UPC Code Generator Tutorial
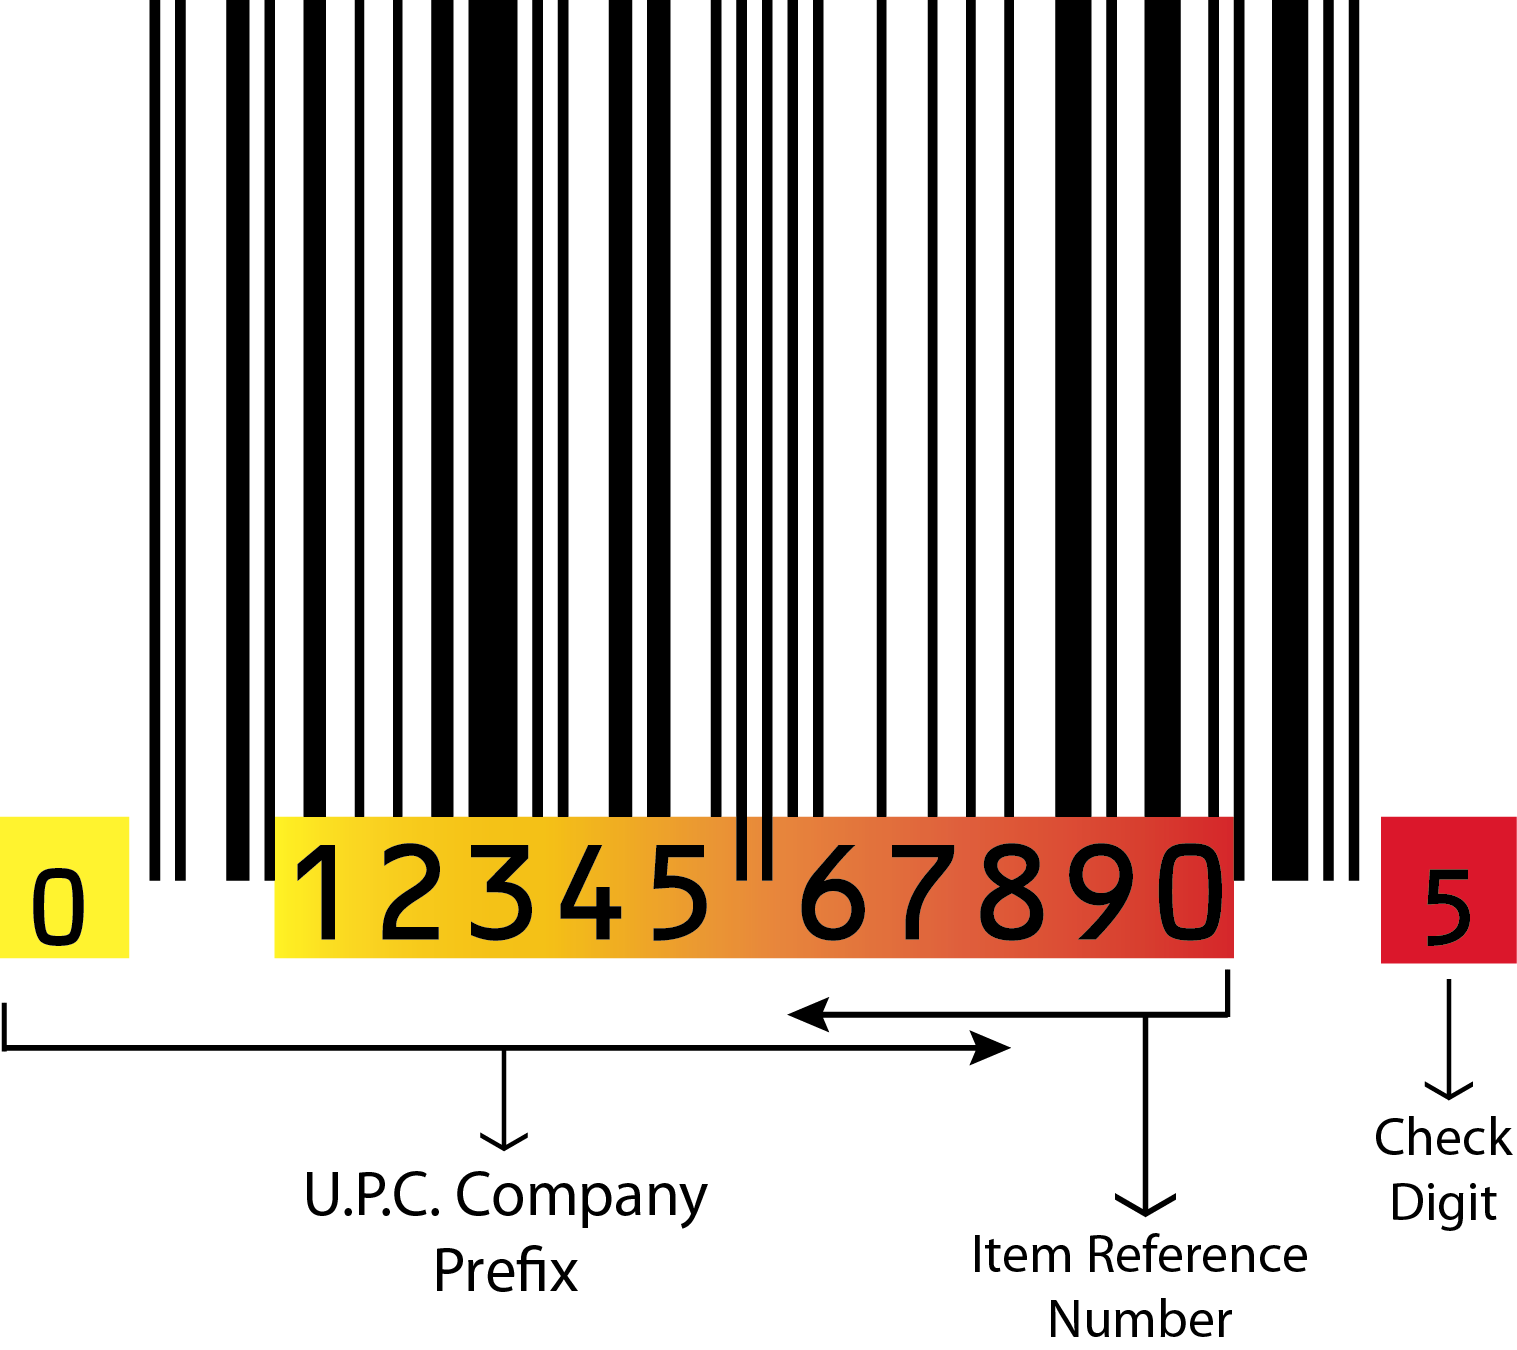
UPC-A Barcode Example (1D)
 ‘
‘

1. Tutorial Introduction
In this tutorial we will show you the different components that constitute a UPC barcode and their functions. You will also learn how to correctly format a UPC barcode in our free online Barcode Generator and how to print UPC barcodes on sheets of labels from Microsoft Word on a standard desktop laser or inkjet printer. We will also give you a brief overview of the GS1 and if you need to have licensed and registered UPC numbers from them.
2. Anatomy of a UPC (Universal Product Code) Barcode
UPC-A barcodes are the most common consumer product barcodes used in North America. If you need to create a barcode for consumer products that will be sold in a retail store by you, then you will need to create UPC-A barcodes.
A standard UPC-A barcode consists of 12 digits comprising of 4 unique sections, and they are: a 'Number System Character', a 5 digit 'Manufacturer Number', a 5 digit "Item Number', and a 'Check Digit.'
3. Choosing the Right 'Number System Character'
When creating a custom UPC barcode from scratch, the following handy reference will help you choose the correct 1-digit 'Number System Character' starting all UPC-A barcodes as shown in above image. Here is a listing of what the different number system characters from 0 to 9 denote:
0, 1 , 6, 7 & 8 are for standard UPC-A barcodes (most commonly used for retail applications).
2 is for random weight items such as meats or fruits.
3 is for Pharmacy related products.
4 is for in-store identification of non-food products.
5 & 9 are for coupons or similar usage.
IMPORTANT: it is common practice for the leading 1-digit 'Number System Character' and the following 5-digit 'Manufacturer Number' to be combined into a 6-digit sequence and referred to simply as a “Company Prefix" (Number System Character + Manufacturer Number = Company Prefix).
4. The GS1, UPC Numbers & You
The GS1 (formerly the Uniform Code Council) is a non-profit, global organization that controls the standards and issuance of UPC barcode identifying numbers (Global Trade Item Number®/GTIN®) to companies that distribute their barcoded products nationally and internationally in regulated and monitored distribution channels. Company’s do not buy UPC numbers from the GS1; they are licensed and need to be registered annually for a fee from the GS1. Whether or not you will need to acquire licensed and registered UPC numbers from the GS1 depends on how you distribute your product. For example, if you are an individual or small company distributing your barcoded items directly to the end user customer, then you probably do not need to obtain a Global Trade Item Number® from the GS1. See paragraph 5 below for more on this topic.
5. 'Company Prefix' & 'Item Number' Creation
This tutorial on how to create a fully functional UPC-A barcode from scratch assumes that you do not already have nor are required to have a Company Prefix (aka Global Trade Item Number®) and a 5-digit 'Item Number' that must be obtained and registered by the GS1 for a fee, and that you do not need to sell your barcoded item on Amazon(TM) or via any other regulated distribution channel requiring annual GS1 licensing of your company and product Global Trade Item Number® (GTIN®). If the proceeding criteria applies to you, then you can simply create your own UPC barcode identifying numbers (Company Prefix & Item Number) without the need for licensing them.
6. Importance of a ‘Check Digit’
A ‘Check Digit’ (aka 'Checksum Character' or a 'Modulo Check Character') performs a function as its name implies: if there are any errors or data omissions from either the 'Number System Character', 'Manufacturer Number', or 'Item Number' sequences of a UPC barcode, a correctly formatted ‘Check Digit’ coding will prevent the barcode from being scanned and will cause a barcode scanner to emit an audible error signal. This prompts the user to "check" the barcode to find the cause of the error. In order for a ‘Check Digit’ to function properly, it must be formatted correctly – more about this in the following section below.
Note: most barcode scanners can be programmed to omit a ‘Check Digit’ if need be; however, this is not recommended due to it can result in increased inventory tracking errors.
7. How to Calculate a UPC Barcode 'Check Digit'
The last number in a standard 12 number sequence UPC barcode is a ‘Check Digit’. If you want to create a fully functional UPC-A barcode for an item to be sold retail to a consumer, then you will need to have a correctly formatted 'Check Digit'. There is a specific mathematical formula (algorithm) that calculates the correct ‘Check Digit' for a UPC barcode, but don’t worry…you won’t have to do any math here, simply click the fllowing link to the GS1 website: https://www.gtin.info/check-digit-calculator/, enter the 11 digits (Number System Character + Manufacturer Number + Item Number = 11 digits) of your custom UPC barcode to get the correct ‘Check Digit’ (12th and final number of a UPC barcode).
8. UPC Barcode Label Size
The most popular label size for a UPC-A barcode is 1.5 x 1 inches.
To format the size of your UPC barcode created in our online Barcode Generator so that it will fit a 1.5x1 inches dimension label, please use the following settings:
1. Bar Width: Set to ‘1’
2. Height: Set to ‘60’
3. Margin: Recommended default of ‘10'; however, you should increase the margin if the top of your barcode is too close to the label’s edge when printed.
4. Font Size: Recommended default of '20.'
5. Text Margin: Recommended default of '0'; however, you can decrease if you have difficulty with spacing from bottom margin.
Note: there is no need to adjust the Font or Color Options in our Barcode Generator when formatting a UPC barcode.

9. Printing UPC Barcode(s) in Microsoft Word/Office 365
A cost-effective solution for printing barcodes on sheets of labels is to get Compulabel 1.5" x 1" labels on 8.5”x11” sheets (50 labels per sheet) and use the Compulabel #310151 template when formatting your barcode labels in Microsoft Word/Office 365. Here is an example of what the finished barcodes will look like in the Microsoft Word template for Compulabel #310151 labels:

10. Instructions to Format UPC Labels in MS Word: Open a new/blank document in Microsoft Word, then click on 'Mailings' in the top menu bar, then click on 'Start Mail Merge’ in the menu ribbon and choose 'Labels', in the 'Label Options' dialog box that opens, choose 'Compulabel' from the list of 'Label Vendors', then choose 'Product Number' and '310151 - UPC Bar Code Labels', then click the 'OK' button. You should now see grid squares (label outlines) 5 long and 10 high. You can then right click in each square and paste your custom barcode image. Or, if you want to print multiples of the same barcode, you can highlight all of the grid squares and then press the 'CTRL + V' keys to mass paste the barcode image.
Print Warning Message: when readying to print your barcode labels, Microsoft Word may display the following warning: “Your margins are pretty small. Some of your content might be cut off when you print. Do you still want to print?” Ignore this message and click the ‘Yes’ button in the dialog box.
IMPORTANT: the higher a barcode’s print resolution and quality is, the higher the first time read rate of it by a barcode scanner will be. Therefore, we strongly recommended printing sheets of UPC barcodes with a laser printer for best results. *Be sure to test your custom barcode labels first before printing en masse and affixing to products.*
11. Barcode Scanner
Need a barcode scanner to scan your newly printed barcodes? We offer a wide selection of 1D Barcode Scanners to choose from. If you need assistance when purchasing a barcode scanner from us, don’t hesitate to message, email or call us, and one of our friendly point of sale experts can assist you.
12. YouTube Instructional Video
13. Additional Resources
Want to track inventory of your newly barcoded items easily and for free in Microsoft Excel? Watch this video and learn how to save time and money.
DISCLAIMER: Our free online Barcode Generator and its accompanying instructional tutorial(s) are “As Is” with no warranties of any kind expressed or implied.